DOCs: First steps after installation
Posted: May 24, 2010 10:40 am
After you installed the module successfully, there are just few simple steps left to display it on your site front-end.
Step 1: Access the Module Manager panel
From back-end setting panel of your site, go to: Extensions > Module Manager.

Step 2: Find RAXO module you installed
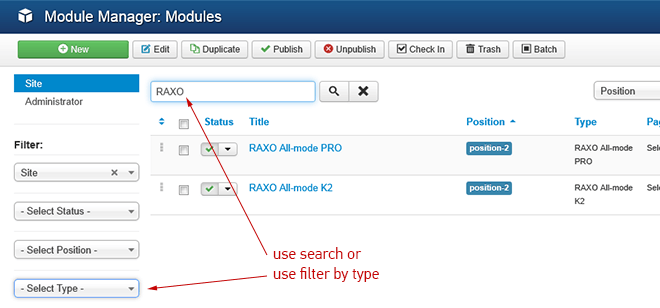
There are two simple ways to find the new installed module:
- Search by word "RAXO"
- Use Filter > Select type > "RAXO All-mode PRO" or "RAXO All-mode K2"

Step 3: Enable the new installed module
Enable and set position for the module
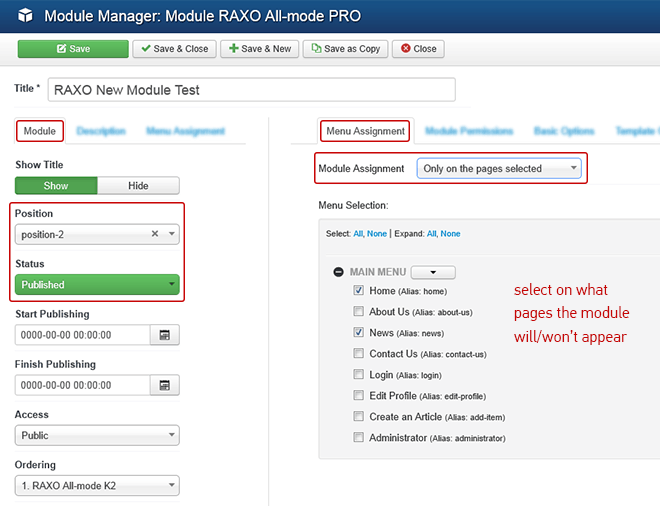
In the module administration panel go to tab "Module".
To display the module in front-page, you must publish it and choose an appropriate module position.
Note: Not all module positions can be active in front-page, so please make sure the module is assigned to a proper module position of your site template.
Assign the modules to specific menus
You have to assign the modules to specific menu items so that the module will be displayed in the pages of these menu items.

Step 4: Basic module configuration
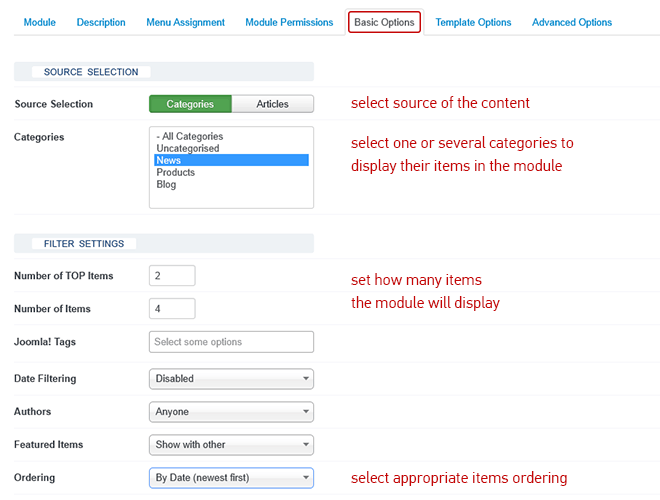
RAXO module have many parameters and options. Here we mention the very basic things enough to display the module in front-end of your site. Go to tab "Basic Options". Here you need to decide what is the content source for the module, how many items and in what order you want to display them in the module.

Step 5: Module template configuration
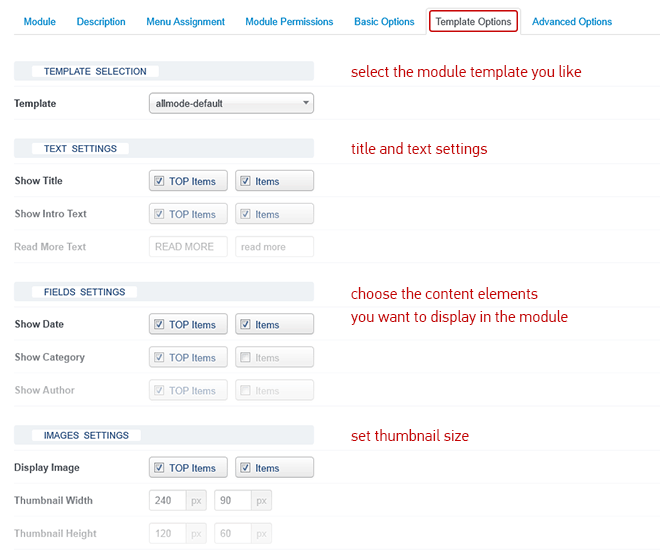
RAXO modules come with three built-in templates and you can easily switch between them.
Go through template options and enable the content elements (date, title, author, hits, etc) you want to be displayed in the module.

Now just press button "Save and close" and go to your site front-end to see the results.
Note: All module parameters have helpful descriptions. Just put cursor on any parameter name and the description will appear.
Step 1: Access the Module Manager panel
From back-end setting panel of your site, go to: Extensions > Module Manager.

Step 2: Find RAXO module you installed
There are two simple ways to find the new installed module:
- Search by word "RAXO"
- Use Filter > Select type > "RAXO All-mode PRO" or "RAXO All-mode K2"

Step 3: Enable the new installed module
Enable and set position for the module
In the module administration panel go to tab "Module".
To display the module in front-page, you must publish it and choose an appropriate module position.
Note: Not all module positions can be active in front-page, so please make sure the module is assigned to a proper module position of your site template.
Assign the modules to specific menus
You have to assign the modules to specific menu items so that the module will be displayed in the pages of these menu items.

Step 4: Basic module configuration
RAXO module have many parameters and options. Here we mention the very basic things enough to display the module in front-end of your site. Go to tab "Basic Options". Here you need to decide what is the content source for the module, how many items and in what order you want to display them in the module.

Step 5: Module template configuration
RAXO modules come with three built-in templates and you can easily switch between them.
Go through template options and enable the content elements (date, title, author, hits, etc) you want to be displayed in the module.

Now just press button "Save and close" and go to your site front-end to see the results.
Note: All module parameters have helpful descriptions. Just put cursor on any parameter name and the description will appear.